
> Intro
> Create
• Evil Flaws
— HDRI: Evil Flaws —
HDRI Flaws
Negative Light
You only go for an outdoor HDRI if there is no wind and this is, of course, even more
true for HDRI panoramas. However, it is not always easy to watch each and every twig
and leaf that is in view of the camera. Additionally, an HDRI panorama ought to be taken
in a minimum of time because sun and shadows advance mercilessly. In the heat of the
moment it happens that one gets a bit careless. And back at home, to the astonishment
of the photographer, the shots refuse to combine to a nice HDRI panorama.

After assembling a HDRI panorama in PTGui 7.8, I discovered such ugly parts as shown above. It was found in the zenith exposure and is shown undistorted and in the context below.

When looking at the original photographs, it begins to get clear that there was some wind involved. The stitcher has no problem with this if the control points on the leaves are removed and replaced by some at a stable tree trunk.
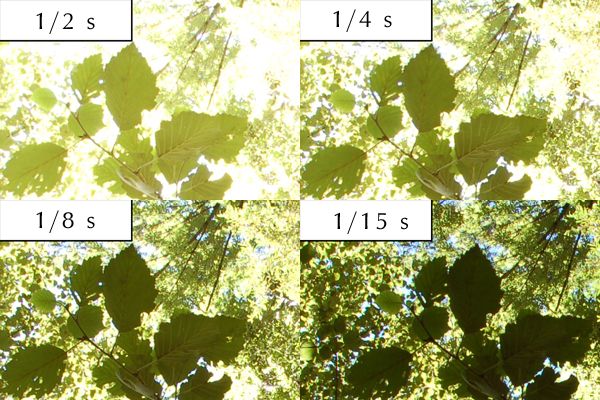
Actually, neither has the HDRI program a problem wirth this. The displaced leaves appear several times and seem to be unfocused or look like ghosts. It only gets annoying if the leaves move in front of a very bright background and the shorter exposure produces more light at a spot than a longer one does. The effect of this is that the camera transfer curve suddently works inverse.

The series of photographs from the zenith was assembled to an HDRI, once in HDRShop 1.03 and once in Picturenaut 2.12. HDRShop — like PTGui (even with a normalised camera curve) cannot handle «negative» light correctly, with different results, though. Picturenaut could do it: we see the «ghosts».
Workaround
Usually, I throw all exposures into a folder and let PTGui do the job for me. This time,
it did not work as expected.
The workaround was as follows: first, an HDRI was created from the zenith series using Picturenaut. Along with the finished HDRI, Picturenaut 2 also saves the calculated camera curve. Then, all other series were assembled to HDRIs using the same camera curve as for the zenith series. That was spade work. The HDRIs were then submitted to PTGui and it created the HDRI panorama in a third of the usual time. The result is good enough, considering the circumstances.
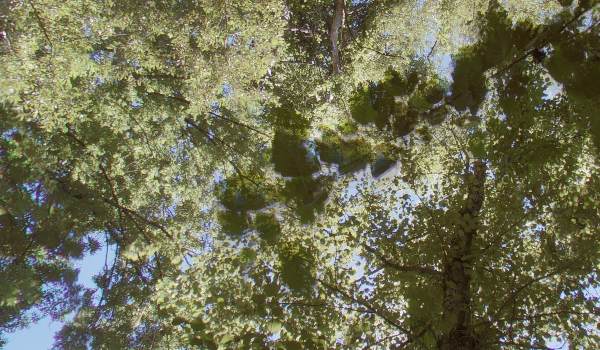
Extracted from the QTVR made from the 8270 x 4135 pixel spherical HDRI panorama. Below the tone-mapped panorama.

The Cameracurve in PTGui
PTGui calculates the vignetting and the light response curves. Vignetting is the attenuation
of the light from the centre of the lens towards the edge. Only an ideal lens has no vignetting.
The light — or camera — response curve is linear in an ideal world, but this is not
an ideal world. A linear response curve would mean that a particular change of light intensity
at the entrance of the lens also changes the light on the film, CCD or CMOS chip by exactly the
same amount.

If curves are calculated like those shown above, you will be in trouble. At left, the vignetting curve is flat. With all respect for the lens used, this never happens in real life.
The response curve is so utterly wrong that it will be very difficult to find such a lousy lens. I have seen still worse curves where you could find peaks at the left side. The curve shoots over the upper edge of the diagram too early. Full brightness has not yet been reached at the entrance of the lens and the film, CCD or CMOS chip is already saturated. These are the curves obtained from the jungle-example above.
This is how the curves ought to look like. At left, we have a decrease from left to right: this means that the lens absorbs light towards the edge, it shows vignetting, and this is unfortunately to be expected. At least, this flaw — because of known extent — can be corrected by the stitcher.
On the right side, a response curve that makes sense. Unfortunately, neither ideal but soon after the dark parts at left straight over far stretches, i.e. linear. Whether this curve was accurately acquired, we do not know but it does make sense and it can be used to produce an acceptable HDRI panorama (the curves are from the «Illhorn» panorama).
If unsensible curves are calculated, the result will be accordingly. Sometimes, you can resort to a curve acquired with another project if you had saved it; somtimes, this does not work. In the jungle-example above, it did not work and that is why the panorama was finally assembled from the HDRI pictures.
Digital images can also be «developed». If saved in the camera as RAW, the the program from the camera manufacturer usually supports the correction of vignetting if a known lens was used, and can also compensate part of the camera response curve when converting the raw image to a standard image file format.
© 2004 - 2018 by Horo Wernli.