
< 3D World
> Intro
• Overview
> Bryce
— 3D World: Panorama, Overview —
What are Panoramas anyway?
Pictures in the portrait format are used for portraits or towers, the landscape format for landscapes. This is probably quite obvious. Then, there are wide angle photographs that show even more of the scenery.
Panoramas are pictures that show a scene with a very wide angle, 120° or more. More means 180° or even 360°. In a 360° picture, you may mentally connect the right with the left edge of the picture.
Traditionally, pictures are shown on a flat surface: a photograph, a print, a computer screen. In museums, you may sometime come across gigantic photographs or paintings on the wall inside a round room and you are standing in its center. You see the whole panorama when you turn around. You are standing inside a cylindric panorama and this is very impressive.
If the panorama continues from the walls up to a domelike ceiling, you are standing inside a (hemi-) spheric panorama and this is usually quite an experience. Viewing movies in a dome is sometimes (erraneously) called «3D».
With the free viewer QuickTime by Apple, which is also available for PC, cylindrical panoramas can be moved within a window and instead of turning around yourself, the scenery in the window is moved. You may even zoom in or out.
Since version 5, QuickTime can show cubical panoramas, too. Imagine yourself standing within a cube or a sphere, because you can not only move left or right, but look up and down as well.
Panoramas can be made from photographs. We will just touch this, but we will concentrate mainly on creating panoramas with the raytracing program Bryce.
Yes — and the good news is: everything you need to do cubic panoramas are a few freeware tools.
The scene used
Instead of shooting with a camera a series of pictures that can be assembled to a panorama, a simple scene was constructed in Bryce. This is a very simple scene and helps to understand, what's going on.
-
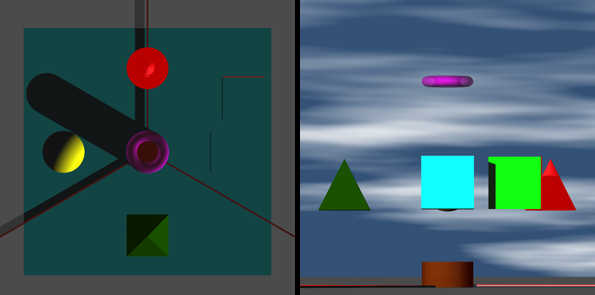
The left part is a view from above, the right one a view from right.
The scene consists of a brown cylinder in the centre, the camera is positioned above it. Below, on an infinite grey ground plane, a cyan square. In front (north) hoovers a red cone, right of it (east), a blue cube, south (behind the camera) a green pyramid and a yellow sphere in the west. On the floor, three long red cubes mark the 120° angles. In the north-east, two upright faces show the 45° position. Finally, a violett ring above the scene towards the zenith.
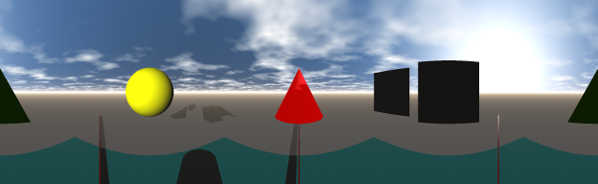
The following four pictures show the same scene as seen with a fish-eye lens. More precise, a fully reflecting sphere was positioned in front of the camera. Those who do not have a fisheye lens for their camera often use a reflecting sphere as perfect as possible. In Bryce, a perfectly reflecting, error free sphere can be put in front of a flawless invisible lens. Additionally, a mask was rendered to create the black frame.
-

Render of the scene with a fisheye.
Such fisheye photographs can be used to create panoramas, provided they are corrected (de-distorted) correctly.
Distortion — Flat World (Diskworld?)
We know this from the map of the world. The Earth is a sphere and the continents can be shown in their correct size and aspect ratio only on a sphere — a globe. According to the projection selected, the outlines appear differently distorted; the island Greenland is represented larger than the continent Africa.
A panorama strip may be correctly shown on a cylinder. A spheric panorama has to be projected in a sphere.
A photograph — and a render, too — is a rectlinear (flat) picture of a part of a sphere. The rectlinear picture has to be remapped into a cylindric or equirectangular (spheric) picture.
The following picture shows a series of snapshots of the example scene. The camera has a field of view (view angle) of 120° and a quadratic (not rectangular) lens. Three strips were taken: Zenith, Horizon and Nadir. For each strip, the camera was rotated by 90°. Thus, the pictures intersect at the edges which helps later when the panorama is assembled — stitched together.
-

Zenith (Sky): North, East, South, West; Horizon: N, E, S, W; Nadir (Floor): N, E, S, W.
With those 12 rectlinear pictures you cannot create a panorama. For the following picture, the middle four pictures were converted into a cylindric projection.
-
Far left and far right: South; then from left: West, North, East.
This cylindric panorama appears distorted on the flat computer screen. Note the edges of the cyan square on the floor. This picture has to be projected on the inside wall of a cylinder.
For the next picture, all 12 single pictures were stitched equirectangular (spheric).
-

To the panorama strip above, zenith and nadir are added.
This spherical panorama is even more strangly distorted then the cylindrical farther up. The ring in the zenith perverted to a straight line. This picture has to be projected on the inner side of a sphere.
The picture below shows at left the cylindrical and at right the spherical panorama projected onto the correct surface.
-

Left cylindrical, right spherical.
Now we have got a rough idea of the topic and the ptoblems that present themselves if an image that depicts a full environment is presented on a flat surface.
© 2004 - 2021 by Horo Wernli.