
< 3D World
> Intro
> Overview
• Combining
— 3D World: Mirror Ball, Combining —
Inserting missing parts and getting rid of the unwanted
There is a Blind Spot behind the mirror ball and those parts of the environment that are reflected near it have a low resolution and are grossly distorted. On the region with the best resolution and the least distortion the camera is reflected — of all possibilities. In case the photographer could not jump into hiding, he or she is mirrored on the best spot as well. Mirrors have always been for the vain …
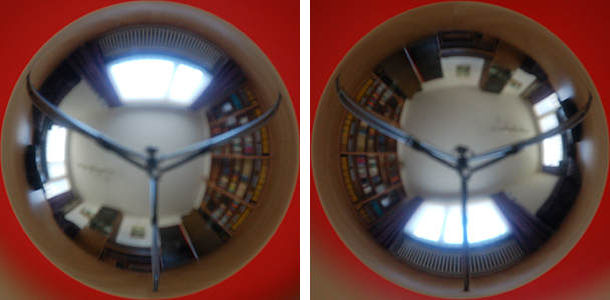
Equatorial View
First, take a photograph from the mirror ball, then move the camera around the mirror ball by about 90°, then take another shot. The second shot is not taken from the opposite direction (180°) because the informtion on the front side is missing and that will be needed to get rid of the camera.

The picture shows both photographs of the mirror ball at 90°. Those here are out of a series for an HDRI light probe.
The spheres on the photographs have different sizes: the left one has a diameter of 1,920 and the one at right of 1,926 pixel. Of course, this cannot be seen in this reduced size.The mirror ball has a diameter of 2.5 inch, the camera is 39 inches (99 cm) from its centre. There is 1% of information missing and the pictures were supplemented with a frame of 10 pixel. This, too, is not shown here.
Then, the pictures were transformed into the spherical projection. The size of both pictures was set to 2,560 x 1,280 pixel. This is a bit more than the information contained. The effective area of the circle is:
- (1920 / 2)2x PI = 2,895,292 pixel2. The aspect ratio for a spherical projection is 2 : 1, the smaller side will become (SQRT = square root) SQRT(2,895,292 / 2) = 1,203 pixel, the long side 2 x 1,203 = 2,406 pixel, the area 2,894,418 squarepixel. The slightly more generous picture got 1280 x 2560 = 3,276,800, that's 13.2% more. You may want to scale down the final picture to 2048 x 1024.
When you have the spherical projection in front of you, don't forget to flip the picture horizontally — we've photographed a mirror, after all.

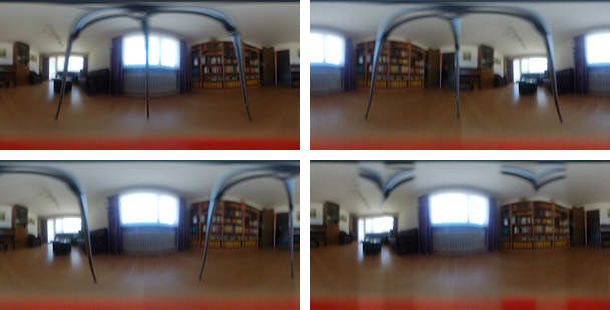
The mosaic shows above the transformed, de-mirrored photographs. Below at left, the photo from top right is rotated by 90°. The same objects are now aligned, the Blind spot moved from the edges into the picture, camera and photographer moved to the right. The white cross stems from the white frame which was added to the picture before.
Below at right, the combined pictures. The alpha mask shown at far right helped in this operation. The white part of the mask added the picture from top while the black part added parts from the lower picture. At the grey part, the pictures are cross-faded.
The result is shown here in a very small size and gives the impression of being perfect. The picture below shows three critical parts in full size:
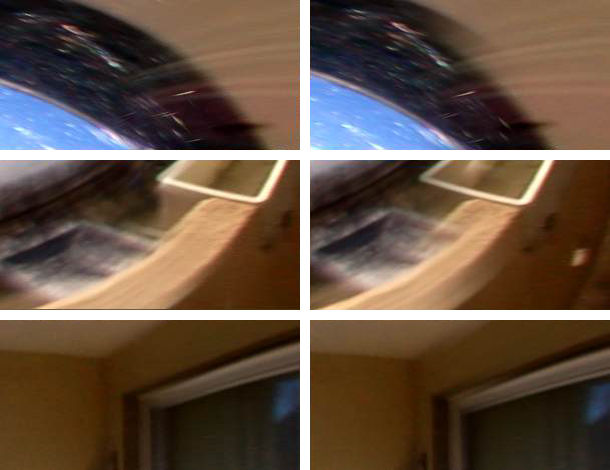
The mosaic above shows on the left side how it actually looks. The empty windowbox and the balustrade of the balcony are not completely clean, the rest doesn't look bad. Not so on the right side. No frame was added to the cropped mirror ball photographs and they were transformed directly into the spherical projection. The flaws are apparent: on the roof of the balcony; the windowbox with a frame but no body, and the ghost balustrade; on the top of the window frame.
The flaws become evident where one picture flows into the other. It is therefore mandatory that the pictures get equalised correctly in the first place.
Another thing that is not evident in this series of pictures: differences in brightness and colour. Even though the camera is set to manual and automatic white balance disabled, the photographs of the mirror ball will show smaller or larger differences in brightness and colour saturation and hue. Before combining, brightness and colour differences have to be addressed. This can be approximated by measuring the RGB values at the same object in both pictures, calculating the difference and have the pictures recalculated with new values. It is hard to get it absolutely right, but a good approximation is very helpful, the differences get much less striking.
If you work with pictures larger than the final result is supposed to be, flaws get less offensive after the reduction in size.
Polar View
For this example the reflection of a mirror ball was rendered in a Bryce landscape. A simple tripod with a cube-camera on a boom was constructed to simulate the problems of a practical approach. Everything got nicely red to catch the eye. The reflection on the sphere was rendered four times: twice from above from opposite directions (180°) and again twice from below.
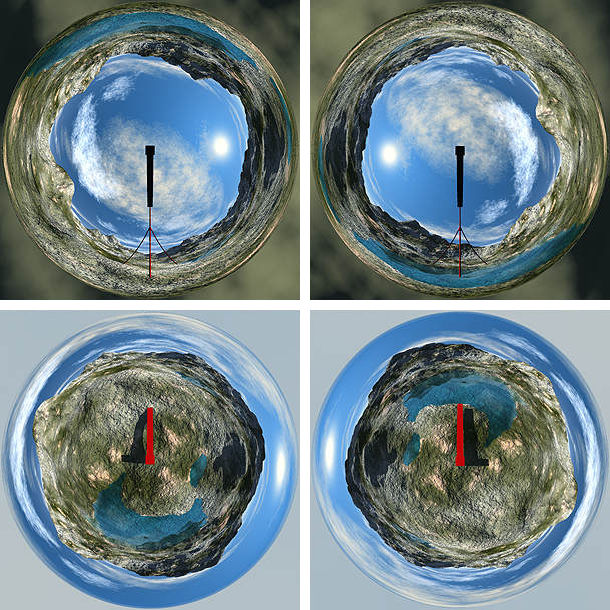
The picture above shows the four renders. On the top row, the renders from above, on the bottom row the renders from below. These had to be tilted back to horizontal before they could be transformed into the spherical projection.
The mosaic shows above both renders from top down, camera and boom are away from the sun and hence dark. At the lower end the missing part from underneath the sphere. The lower row shows the renders from below up to a hovering sphere. Here, camera and boom are in the full sunlight and therefore brightly red. On the sky, the part hidden is missing.
The camera is 20 units above or below the centre of the sphere. The diameter of the mirror ball is 0.27 units. The pictures had to be squeezed vertically by 2 per mille (one-tenth of a percent, i.e. 0.9978513).

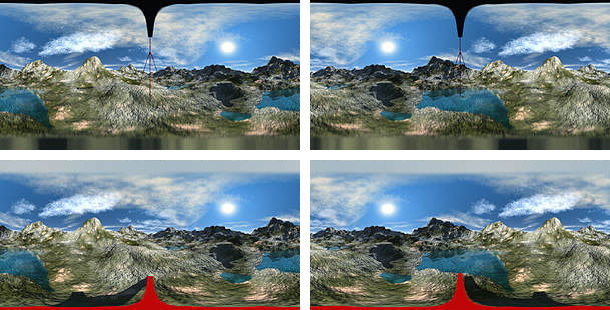
First, the upper half of the render from above was combined with the lower half of the render from below. That way, the sphere got complete. The result is shown in the upper half of the mosaic. Then, the picture on the upper right was rotated by 180°, the result is shown on the lower left. Finally, the picture from above left was combined with the one at lower left, resulting in the picture shown at lower right. Tripod and boom have disappeared. What remains is the camera at the zenith and the nadir. It cannot be simply removed because it covers opposite parts and no information is available to substitute.
We could cut out the picture without the top and bottom bands and copy it into a new picture that would have to be stretched vertically to get it back to the 2 : 1 aspect ratio.
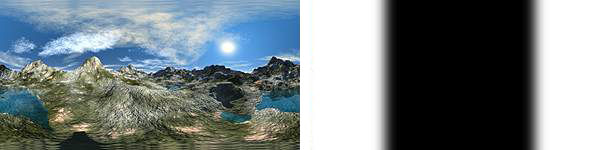
I removed the camera differently: a part from the sky just beneath the camera was copied over the black band. The same was done with part of the ground that was copied over the red camera. The result is shown on the left side of the picture above. At right, the alpha mask that was used to combine the 0° and 180° pictures.
An experiment
Mostly for the fun of it but also to show the problems, a mirror ball was photographed from above. The camera on a tripod right over it. Then, the attempt was made to create a panorama from this.
Of course, the photographs from below up to the mirror ball are missing. The bit I've got is not even well focused.
Above the photographs, below at left rotated and below at right combined. You cannot get rid of the tripod easily, but it would be possible with a very elaborate custom built mask …
© 2004 - 2018 by Horo Wernli.