
< 3D World
> Intro
> Overview
• Projections
> Bryce
— 3D World: Panorama, Projections —
Cylindrical Panoramas
Cylindrical panoramas must not necessarily extend over 360°. A 120° or 150° panorama of a landscape or a painted wall might be already very nice to have.
Strip-Panoramas with a Digital Camera
If you want to do a clean job, you put the camera on a tripod and align it
horizontal. Then, take the shots and turn the camera in one direction in such a way
that 25% to 30% of the edges of the new and the last shot overlap. You may also
shoot The panorama without a tripod. The result will be either narrower or the
flaws are visible. Here, a slugish example of a 150° panorama that is nice
anyway.

Strip-Panoramas with Bryce
It is very simple and straightforward to create 360° panoramas from Bryce
renders. It is mandatory, though, that you have QuickTime installed with the
«Authoring Tools». You can install them even though you do not use the
pro version but the free one. Bryce needs those tools in order to be able to export
to QTVR.
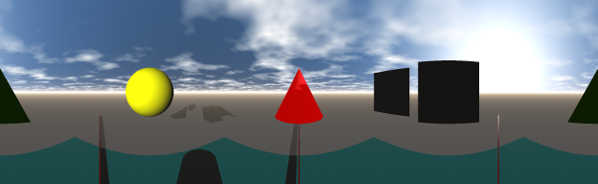
To create a panorama in Bryce, set up the document with the option QTVR Panorama. The document will be created with a size of 1248 x 384 (aspect ratio 13 x 4). The size may be changed but the wider side must be divisible by 13 and the smaller one by 4.
When your scene is ready, select 360 Panoramic Projection from the Render Options (left hand side, lowest grey arrow). You get a cylindrical panorama as result. From the File menu, select Export Image. A save file dialog opens. Select from the drop down filetypes QuickTime VR-Files (*.mov). Bryce creates a cylindrical panorama that can be opened with QuickTime. If the QuickTime option does not appear in the save file dialog, QuickTime is not installed on the computer or Bryce cannot find it.
This panorama of the test scene was created exactly as described above.
Spherical Panoramas
Spherical panoramas are 360° wide and 180° high. They are sometimes also called Equirectangular or Latitude/Longitude (Lat/Long).
Spherical Panoramas with a Digital Camera
This is quite tedious! Depending on the focal length of the lens used, a considerable number
of exposures are necessary. The camera is mounted on a tripod and several rows of 360°
have to be photographed to cover the environment completely from zenith to nadir. The pictures
should overlap on all four edges with the appropriate edge of the neighbouring picture in order
to be able to stitch them correctly together.
The following picture-mosaic was created in Bryce from the example scene. The camera has a square lens that «sees» 90° horizontally and also 90° vertically. The camera was rotated and tilted by 45°. Thus, all edges overlap by 25%.
-

40 pictures: 5 rows with 8 pictures each.
These pictures must be combined to a single, equirectangular picture. The following picture shows the result.
-

Equirectangular picture from 40 individual pictures.
By the way, the equirectangular projection was already used by Marinus of Tyre in 100 A.D. to create geographical maps.
Spherical Panoramas with Bryce
Because the Bryce camera is invisible and perfect, it is a bit simpler to create spherical
panoramas in Bryce than with a camera, although not as simple as creating cylindrical
ones.
It can also be done with less than 40 separately rendered views. I performed many experiments and came to the conclusion that 12 separately rendered views are the best compromise. It can be done with half that much but the render time more than doubles, because the views have to be rendered bigger.
Set the camera angle to 150° and render three views 120° apart; tilt the camera 60° up for the upper row and for the lower row 60° down. This gives you 6 pictures. The usable surface of each picture is only 35% after the equirectangular conversion. You have to render each view to a picture 1.2 times wider than the width of the final panorama. This asks for render time.
Set the camera field of view to 120° and render 3 rows with 4 views each. The size of the individual pictures must be 55% of the width of the final panorama. The camera is moved in 90° steps horizontally. For the zenith row, tilt the camera 30° or 45° up, an equal amount down for the nadir.
Load the pictures into Hugin (or another panorama stitching program) from top row left to bottom row right. Since field of view (actually angle of view), rotation and tilt angle are known, you can enter the values directly into Hugin. Then have the control points be found by either the Autopano or the Autopano-SIFT program and have the PanoTools stitch the pictures together. You get a QuickTime Virtual Reality (QTVR) movie by dragging the resulting picture and drop it on the icon of the program PanoCUBE.
There is a simpler and more elegant solution for creating 360° x 180° panoramas in Bryce: Cubic Panoramas.
Cubical Panoramas
Cubical panoramas are 360° wide and 180° high. The six faces of a cube are rendered.
Cubical Panoramas with a Digital Camera
Forget it! You need a lens that produces a quadratic image on the film emulsion, the CCD- or
CMOS-sensor. The horizontal and vertical angle of view must be exactly 90°. Who has got a
lens like that for his or her camera? Cubical and spherical panoramas are identical for the
viewer.
Cubical Panoramas with Bryce
With only few additional effort, a cubical panorama can be prepared in Bryce with just six
pictures. These pictures can be converted into a QTVR movie with GoCubic within seconds.
The resulting panorama will be four times wider and twice as high as anyone of the rendered
images.
Create a document with a square aspect ratio and set the field of view (FOV) to 90°. Set the Rotate of the camera to X = Y = Z = 0°. Render the view due north of the scene and save the resulting picture as scene1.tif. Then, set the Y-Rotation to 90°, render the view due east and save the picture as scene2.tif. With Y = 180° you get the south view as scene3.tif and with 270° the west view as scene4.tif. Finally, rotate the camera back to Y = 0° and tilt it with X-Rotate to -90°. This is the view to the zenith from north and has to be saved as scene5.tif; now tilt the camera down (X = 90°) and save the nadir render as scene6.tif.
Alternate nomenclature: North = Front; East = Right; South = Back; West = Left; Zenith = Top; Nadir = Bottom. The picture shows, what is meant. The Scale of the camera is set to 100%.
-

6 Renders: Camera FOV 90°, Scale 100%.
Look at the edges. There is something wrong! If the camera Scale is set to 50% while the FOV is left at 90°, the following six pictures are obtained. Again, the edges do not fit.
-

6 Renders: Kamera FOV 90°, Scale 50%.
Look at the edges. Here, too, something is wrong, but not in the same way as above! The field of view of the camera depends on the angle selected and the Scale used. For each desired FOV angle, the Scale to be used is different. The following table was empirically created from several measurements. If the FOV is set along with the Scale shown in the table, the horizotal width of the angle of view corresponds exactly to the FOV angle set for the camera.
-
FOV
(°)Scale
(%)FOV
(°)Scale
(%)FOV
(°)Scale
(%)FOV
(°)Scale
(%)15 79.50 60 76.70 105 68.90 150 46.50 30 79.00 75 75.00 120 63.85 165 29.50 45 78.25 90 72.50 135 56.90 180 < 0
If you set the Scale for the camera to the value shown in the table for 90°, namely 72.5%, you get the following six pictures with edges that fit exactly.
-

6 Renders: camera FOV 90°, Scale 72.5%.
Scrutinise the edges. Here, they do fit! The simple trick to prepare cubical panoramas in Bryce is to find the correct Scale value for a field of view (actually angle of view) of 90°. The small, free tool GoCubic does the rest.
© 2004 - 2021 by Horo Wernli.