
> Intro
> Overview
• Fisheye
> Cube
> Light
> Filter
> Plugins
— IBL and HDRI: HDRShop, Fisheye —
Circular Fisheye Lens
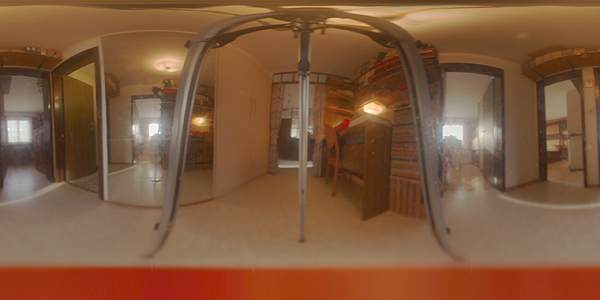
Circular fisheye lenses have an extremely wide angle of view (180° x 180°). The environment in front of the lens is circularly picked up. Usually, the camera is held horizontally and everything from floor to sky and left and right is gathered. A circular fisheye lens can also be used differently: the camera is pointed to the sky. With this the camera sees the whole environment around itself and picks up a 360° panorama from horizon to zenith. This is the more interesting application of a fisheye lens.
 |
Example left: a circular
fisheye lens with an angle of view horizontal and vertical 180°.
Example right: zoom fisheye lens 8 mm to 15 mm. At 8 mm it is a circular and at 15 mm a full frame fisheye with an angle of view of 180° diagonal. |
 |
Those lenses are rather expensive and work as 180° x 180° only for FX DSLR cameras. The chips in DX DSLR cameras are smaller than a 35 mm film and hence, a fisheye lens will not show the full 180° x 180° field but about 120° x 120° only. You should be aware of that if you consider to purchase a fisheye lens for your DX DSLR camera. There is no limitation for a FX camera. The zoom fisheye above at right works as a full frame fisheye lens on a DX camera at a focal length of 11 mm.
Assuming we have such a lens or a converter for the camera at hand and further assuming a picture has — or a series of pictures have — been taken with the camera pointing straight up, we are again ready for the bad news: HDRShop has not all tools needed to handle this. The good news is that what is missing can be downloaded for free. The Panotools plugins for PhotoShop also work for Gimp and IrfanView (both free).
Convert a series of pictures taken with a fishey lens to a Light Probe
I do not own a circular fisheye lens for my DSLR camera and have therefore
to resort to a picture found on the Internet.
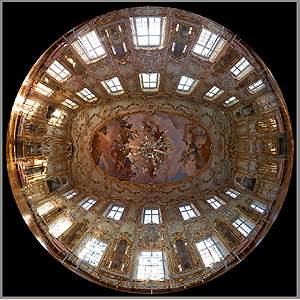
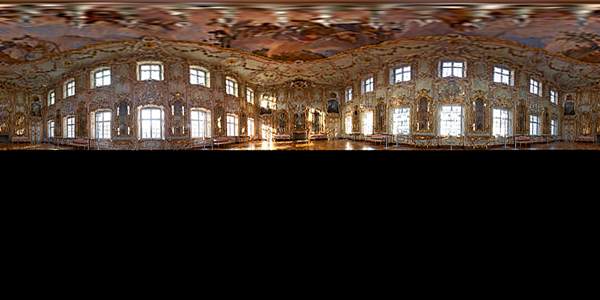
The picture at above shows the Shaetzler Palais in Augsburg, Germany, photographed by Jürgen Schrader. The camera was pointed to the ceiling, which is beautifully shown. The walls and the windows are arranged around the periphery. This is a typical fisheye lens photograph. This picture will nicely do to show what we want to demonstrate here.
Crop
Cropping is very important for the end result and it should be done
carefully and with precision. The picture below shows the steps to
take. [1] Select Window opens the Selection Range window [4]. Draw
Options Dotted Line and Circle [2] have to be ticked, otherwise the
circle around the round picture cannot be seen and croping correctly
will become very difficult. If Restrict Selection to Image [3] is
activated, the selection cannot extend over the picture's edges.
Sometimes it is better to deselect this option.

Now move the mouse with depressed left key diagonally over the picture [4]. A white rectangle with an ellipse inside can be seen. The rectangle can be pulled and pushed at the corners and the edges. The left mouse key must be held down. If you just click into the picture, the selection disappears and you have to start anew.
Move the corner and edges of the selection rectangle until the picture is enclosed by the circle. The numbers in the Selection Range window [4] are of great help to get a true square and hence a true circle. Do not forget to use the +/- and cursor keys to move the picture around the frame in order to see the details. Finally click on Crop [5] to remove the superflous part from the original picture.
First transformation outside HDRShop
Unfortunately, HDRShop cannot transform fisheye pictures directly
into another projection. The cropped picture has to be saved, then
opened in a graphics application which has the Panotools plugins
embedded. Unfortunately, the Panotools plugins introduce a flaw
when transforming a zenith fisheye picture. This can be pre-compensated
for, though. Create a square aspect ratio picture with the sides double
of what the cropped images has. In the example above, the cropped image
is 288 x 288 pixels, the new picture therefore will have to be 576 x 576
pixels. The cropped images is copied right in the centre of this picture.
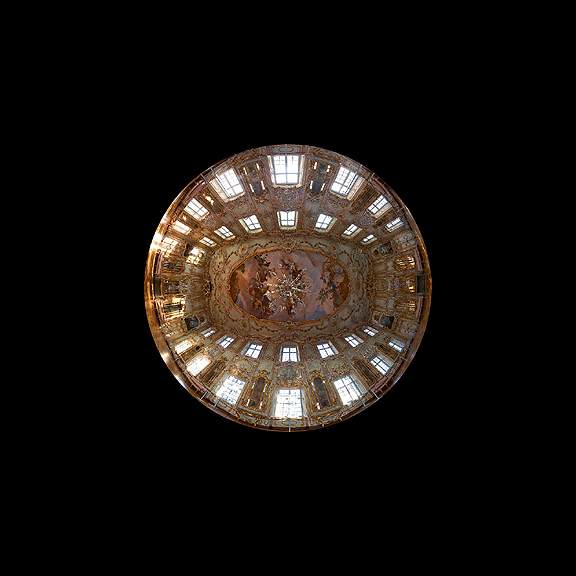
The fisheye picture looks a bit forlorn in this vast blackness but this will save some work afterwards. The picture below shows the Panotools windows. They appear in PhotoShop in the Filter > Panotools menu. Click on Remap [1]. This opens the Remap Options window. If this plugin is used for the first time, some ajustments have to be made. Click on Prefs [2] to open the window below it. The Panotools wish to save the result [3] (b) to hand it over to the graphics application afterwards [3] (c). There are More settings that concern the quality.
Back in the main window of the plugin tick Convert from Fisheye Vertical to PSphere (spherical or Latitude/Longitude). HFOV (horizontal field of view) is 360°, VFOV as well. If the cropped image had not been copied into a double sized picture, HFOV would have had to be set to 180°. The resulting picture would then had become four times wider than its height. A black strip the same size would than have had to be added to the bottom to get the aspect ratio of 2:1.
Back to HDRShop
Save the resulting picture and open it in HDRShop. The picture below at
right shows the result of the transformation. The fisheye photograph as
radial symetrical projection (angular map) as can be used as HDRI for
Bryce IBL.
Click on Image > Panorama > Panoramic Transformations… to open the dialog shown below. If more than one picture is open in HDRShop, define the appropriate one. Select the Format: Latitude/Longitude. The picture size is filled in already. We want a New Image to be created and for the Format Light Probe (Angular Map) is chosen. Enter the expected image size for the new picture. A picture of 600 x 300 pixels has an area of 180,000 square pixels, a circle with a diameter of 480 pixels an area of 180,956 square pixels, which about corresponds to the original area.
The fisheye photograph became an angular map. A simple LDRI was transformed. If a series of photographs are available, you may have to crop each one individually and transform them with the Panotools to PSphere. Then they can be assembled to an HDRI in HDRShop and finally converted to an angular map and saved as a Light Probe.
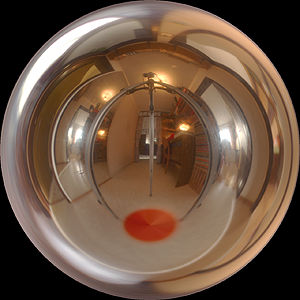
Mirror Ball
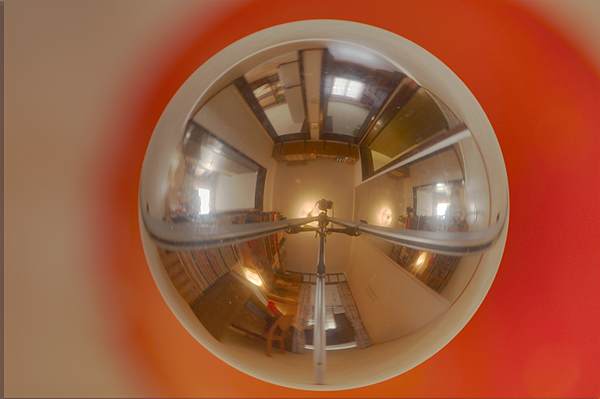
A mirror ball can be photographed from above. This is a bit of a problem for purely mechanical reasons. The transformation to a light probe can be done in HDRShop without the need of using other tools, though. To show how you have to go about it, I took four photographs and created a (bad) HDRI from them. This is the raw picture reduced to 8-bits per colour.
The picture is shown here in 1/5 of its original size. First of all, it will have to be cropped to a square, as shown above for the fisheye — however, a frame around it has to be kept. Open the Panorama Transformation dialog: Image > Panoramic Transformations… as above. The Source Image is in the Mirrored Ball format, as Destination Image we want a New Image, initially in the spherical format (Latitude/Longitude).
Now there is something new coming up. The mirror ball was photographed from above, not from the side; hence it has to be toppled over back to the horizontal plane. Activate the button Arbitrary Rotation and click on Settings [1]. The dialog shown below the main dialog opens. Enter -90° (minus) for the X axes and leave the Y and Z axes at 0. Accept these values [2] and the dialog closes. These are all settings necessary and the transformation can be initialised [3].
After a short moment, the transformed picture appears. Because a mirror ball was photographed, we see a mirrored image. It has to be «de-mirrored»: Image > Transform > Flip Horizontal [4] or simply hit the key 'H' and that is done, too.
The mirror ball photographed from above shows more than only from horizon to zenith like the fisheye. This disadvantage ought not to be concealed: the tripod is a real nuissance. Another disadvantage versus the fisheye photograph is the inferior quality. However, everything can be done with the on-board tools of HDRShop within a few minutes.
How to convert this spherically projected picture into a distance azimuthal projection (Latitude/Longitude to Angular Map) has been shown above for the fisheye already. Of course, the detour over the Latitude/Longitude format is not mandatory. However, if something went wrong, it could be detected much easier in this «intermediate» projection.
Above, the Light Probe fit for IBL in Bryce is shown. Well, the HDRI is not really good enough for this, but at least the format is.
© 2004 - 2018 by Horo Wernli.