
> Intro
> Overview
> Fisheye
> Cube
• Light
> Filter
> Plugins
— IBL and HDRI: HDRShop, Light —
Modifying the Light Intensity of the Light Probe
Uniformly adjust light intensity
As shown in the chapter Mirrorball discussion, the pixel values
of the colours red, green and blue can be individually multiplied by a
factor. If the factor is changed from 1.00 to 10.0, all pixel values of
the corresponding colour are multiplied by 10; if the factor is reduced
to 0.5, all pixel values will be divided by 2.
If the same factor is used for all three colours, the picture can be brightened or darkened. A factor of 2 (or 0.5) corresponds to an opening (or closing) of the aperture of the diaphragm by a full f-stop — or a doubling (or halving) of the exposition time, or halving (or doubling) the shutter speed.
If a series of photographs are assembled to an HDRI in HDRShop, the value of the brightest pixel gets to 1.000. This is not the case in other programs. Such HDRI's have a tendency of not being sufficiently bright for Bryce. In my experience, a good start is, if the brightest pixels have a value in the range of 50 to 100 with the bright parts of the picture around 0.1 to 0.5.
I try out different pixel values until a halfwhite sphere lit by the HDRI gets fully white, but not burned out with an HDRI-Effect value of 100. The light intensity of the lights in the HDRI can easily be attenuated when using Linear or Squared Falloff, so better too bright than not bright enough.
Specularity.
There is no specularity in nature, only reflection. The Specularity
channel of a raytracer such as Bryce simulates diffuse reflection from
a bright light source on a glossy object. IBL can light a scene more
naturally, hence the Specularity channel does not work the same way
anymore. Admittedly, you will discover soon enough that it is not very
obvious to make an object glossy using ony reflection.
A workaround is using a specular map. This is again a simulation but it works fine with IBL. HDRShop offers Specular Diffusion and Convolution to create a specular map from an HDRI. This method finds how the lights are distributed in the HDRI and creates a new HDRI with these lights completely blurred, i.e. diffuse.
The option can be found at Image > Panorama > Diffuse / Specular Convolution…, provided a picture has been loaded before. If you click on it [1], a warning pops up [2]. If the picture is a light probe with a diameter of 1280 pixels, the time to convolve is estimated to be 3,840,000 seconds, which is more than 6 weeks … The picture has to be in the Latitude / Longitude projection, you will have to transform it into that format with a size of 128 x 64 or 256 x 128 pixels.
The convolution will be performed within about 1½ or 6 minutes and the picture size is sufficient. Perhaps you will want to duplicate by clicking on Image > Duplicate because you might want to experiment using several values. Then, enter the Phong Exponent [3].
Small Phong Exponents result in more diffuse pictures that are more suited for smooth surfaces. A Phong Exponent of 1 corresponds to the Diffuse Convolution. The following picture shows the correlation:
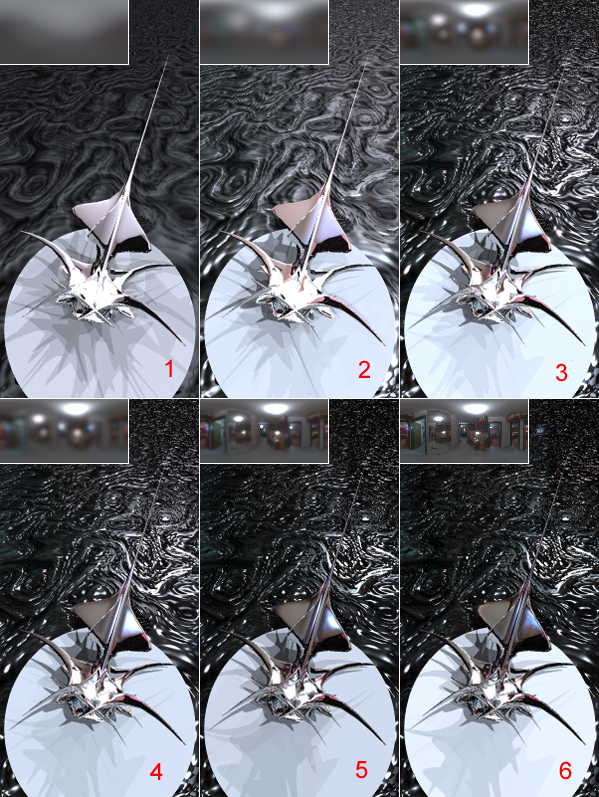
In the top left corner of each subframe, the convoluted HDRI is embedded. This HDRI was transformed to a light probe with 1024 pixel diameter. A smooth reflecting object is lying on a structured reflecting ground plane. Rendering was done with 16 lights.
- 1: Phong Exponent 1.0, Diffuse Convolution; Intensity 60, HDRI-Effect 80.
- 2: Phong Exponent 10.0, Specular Convolution; Intensity 95, HDRI-Effect 12.
- 3: Phong Exponent 50.0, Specular Convolution; Intensity 70, HDRI-Effect 12.
- 4: Phong Exponent 100.0, Specular Convolution; Intensity 60, HDRI-Effect 12.
- 5: Phong Exponent 1000.0, Specular Convolution; Intensity 50, HDRI-Effect 12.
- 6: Original (not convolved); Intensity 50, HDRI-Effect 12.
The original was also transformed from a light probe with 1280 pixel diameter to the Latitude/Longitude projection with 128 x 64 pixel and then transformed back into a light probe with 1024 pixel diameter.
Mathematical Functions
HDRShop provides some fundamental functions. If you remember (e.g.
the work in the darkroom) how some effects develop, a plethora of
possibilities emerge. An attempt to cover them all here would know
no bounds. For example, all pixels in a picture can be set to a specific
value. Image > Pixels > Clear… opens a small dialog that accepts
values for all three colours the whole picture shall be filled with.
That does not sound particularly exciting. But it gets exciting, if mathematical functions are applied to such a picture. We have come across the menu Image > Calculate… already in chapter Mirrorball > Crossface Pictures. There are 10 options. The option with a blue background |A| will be used later. It assures that there are no values in the picture that are negative (Absolute A).
The following picture shows the effect of some of the other functions. Sub-picture A is Image A, picture Ba or Bb Image B.
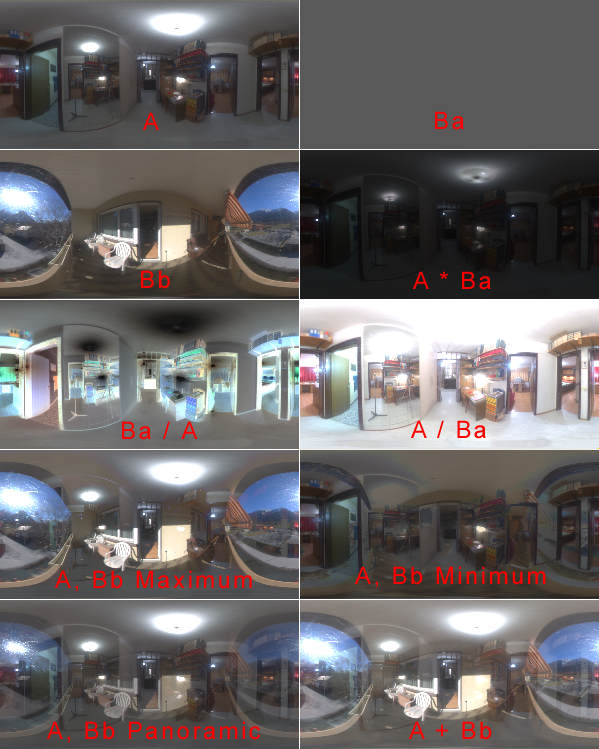
Picture Ba has all pixel values set to 0.1, the result
of A * Ba is equal to Image > Pixels > Scale… with the
RBG values 0.1.
A / Ba brightens the picture exactly as Image
> Pixels > Scale… with the RGB values set to 10.0 does.
However, Ba divided by A (Ba / A) inverts the picture, i.e. brightness
and darkness are swapped.
Two pictures can be combined thus: the new picture gets the brighter pixel of the two (Maximum) or conversely, the darker one (Minimum).
A + B just adds the pixel values from both pictures, Panoramic (or Panorama Blend) on the other hand takes the average of the two values to create a new pixel ((A + B) / 2). These functions calculate up to four pictures.
Boost bright parts of a picture
Image > Pixels > Threshold opens the Threshold dialog. All pixel
values that are at or below the value entered are set to 0. Now what
could that be good for?
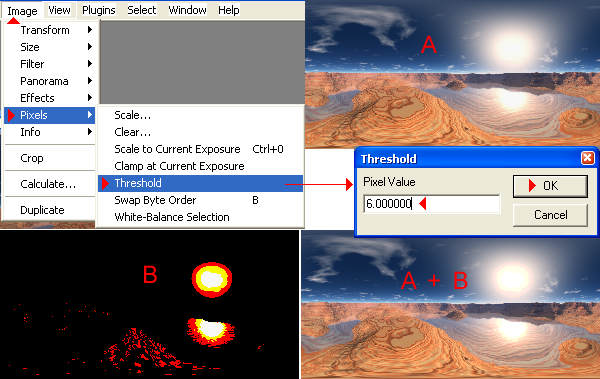
The sun in the upper right picture (A) has pixel values up to about 7.5, the values of the environs are below 1.0. All pixel values at and below 6.0 were set to 0 (B) — this applies to all colours. Both pictures were added as Image A and Image B (A + B). Therefore, only the pixel values of the sun were doubled, the sun shines stronger while the rest of the picture did not become brighter. Although this cannot be appreciated here, the value of the HDRI-Effect control in Bryce IBL can be halved.
© 2004 - 2018 by Horo Wernli.