
> Intro
> Overview
> Fisheye
> Cube
> Light
> Filter
• Plugins
— IBL and HDRI: HDRShop, Plugins —
Installation of the Plugins
The installation of plugins for HDRShop is very straight forward. Create a folder «plugins» in the folder in which HDRShop is installed.
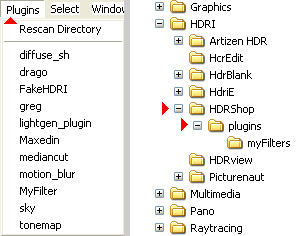
If the plugin is installed — or rather copied into the appropriate folder — while HDRShop is active, just click on Plugins > Rescan Directory and HDRShop will find and list the new addition. The folder is scanned for plugins whenever HDRShop is launched.
Plugins for the Light
Lightgen_plugin
The Lightgen plugin finds the light sources in an HDRI and writes
the ccordinates and colour intensities into a text file which is
mandatory for some raytracing programs. At the same time, a new
picture is generated which can be used for Bryce IBL. The source
image has to be in the Latitude/Longitude projection with a size
of 128 x 64 pixel. The plugin needs the following information:
- Output filename, the filename for the text file.
- Output file type, the file type can be choosen from a drop down list.
- Numbers of lightsources to generate, e.g. 20.
- Maximum number of iterations, e.g. 100.
- Number of Searches, e.g. 5.
- Desired total light intensity, e.g. 10.

The text file can be deleted for Bryce. Enlarge the HDRI with the light dots, transform it to a Ligtht Probe and use it as HDRI light source in Bryce. There is no point in having it rendered as background.
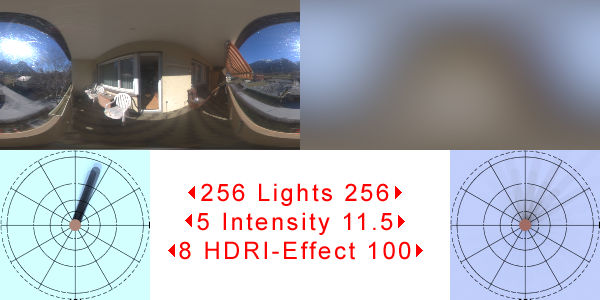
Mediancut
The Mediancut plugin finds the lights in an HDRI and generates a
new picture which can be used for Bryce IBL. The The source image
has to be in the Latitude/Longitude projection, size does not matter,
e.g. 1024 x 512 pixel. This plugin is very much faster than the
Lightgen plugin and needs only these information:
- Number of light (power of two), 2 - 4 - 8 - … 128 - 256 - 512; e.g. 256.
- Luminance scale, i.e. Gamma, e.g. 1.
- Hemisphere Radius, there are 4 for a full sphere.
- None of the options has to be ticked.
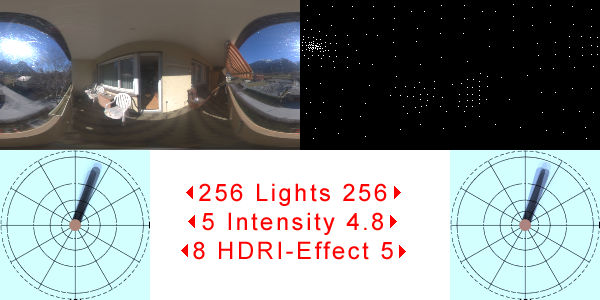
Enlarge the HDRI with the light dots if desired, transform it into a Light Probe and use it in Bryce as HDRI light source. There is no point in having it rendered as background. The similarity of the renders should not surprise you. Bryce 6.1 uses exactly this algorithm to find the lights in a light probe.
Diffuse_sh — Diffuse Spherical Harmonics
The Diffuse Spherical Harmonics plugin works exactly as Image
> Panorama > Diffuse/Specular Convolution… does with
a Phong exponent of 1 (see Light > Specularity). The source
image has to be in the Latitude/Longitude projection, size does not
matter, e.g. 1024 x 512 pixel. This plugin is dramatically faster than
the Diffuse Convolution and does not need any additional information.
Enlarge the diffuse HDRI if you wish, transform it into a light probe and use it as HDRI light source in Bryce. There is not much sense in rendering it as backdrop.
Plugins for the Tone-Mapping
Drago
Tone-mapping method by Frederic Drago. Two parameters can
be supplied:
- Maximum Display Luminance (cd/m²), e.g. 100.0. Determines the brightness of the strong light sources in the picture. The smaller the value, the fainter the lights.
- p (cd/m²); e.g. 0.85. Determines the brightness of the middle and darker parts of the picture. The smaller the value the more they get brightened up (p=0.1), the higher the value, the more they are darkened (p=10).
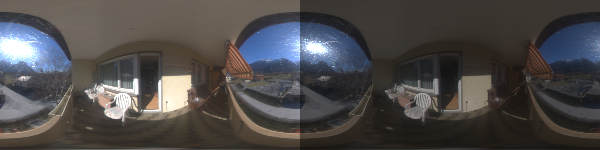
Drago tone-mapping executes very fast. The result is still an HDRI. Linear tone-mapping at the left picture, Drago tone-mapping at right with 100 and 0.85.
Greg
Tone-mapping method by Greg Ward. One parameter can be supplied:
- Maximum Display Luminance (cd/m²), e.g. 100.0. Determines the brightness of the strong light sources in the picture. The smaller the value, the fainter the lights.
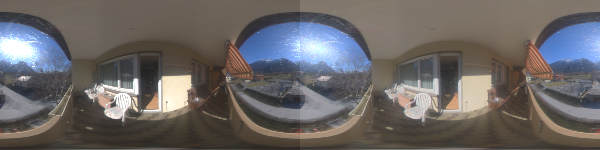
Greg tone-mapping executes very fast. The result is still an HDRI. Linear tone-mapping at the left picture, Greg tone-mapping at right with 100.
Tonemap
Tone-mapping method by Erik Reinhard. Eight parameters can
be supplied:
- Key - Maps log average luminance to this value, e.g. 0.18.
- White - Set white point (L_white in equation 4), e.g. 1e20.
- threshold - Scale selection threshold (do not alter), leave at 0.05.
- phi - Sharpening parameter (1 = no sharpening), e.g. 8.0.
- num - Number of scales to use in computation, e.g. 8.
- low - Pixel size of smallest scale (keep at 1), 1.
- high - Pixel size of largest scale, e.g. 43.
- gamma - Gamma correction value, e.g. 1.6.
Reinhard tone-mapping executes very fast.The result is not an HDRI anymore. Linear tone-mapping at the left picture, Reinhard tone-mapping at right with the default values set in the plugin. This plugin returns some statistical values: the lowest and the highest pixel value before the tone-mapping and the overall dynamic.
Some thoughts about tone-mapping
Tone-mapping does not actually belong to IBL but it does belong to
HDRI. High dynamic images cannot be displayed on the screen. HDRI
capable graphics programs display HDRI's in linear tone-mapping by
default. The result is seldom satisfactory. It is a good idea to
perform tone-mapping in another program than HDRShop. Particularly
so because you can see in the picture in real time what happens when
you change the value of a parameter. Picturenaut has satisfactory
tone-mapping tools, Artizen has excellent ones.
Plugins for other uses
FakeHDRI (cheat)
HDRShop can convert a LDRI directly into an HDRI. Although the
picture has now an HDRI file format, this does not make it a high
dynamic range image. We could multiply all pixel values by a factor
(Image > Pixels > Scale…). However, this global change
has no effect on the contrast of the picture. Chapter Light >
Boost bright parts of a picture presents a possible method.
FakeHDRI is another method to amplify the bright parts of an image.
Three parameters can be supplied:
- Range Min, the lowest pixel value to take into account (like Threshold), e.g. 0.9.
- Range Max, the highest pixel value to take into account, e.g.1.
- Value Max, highest pixel value in the new image, e.g. 10.0
First, measure the brightest area in the picture, e.g. the sun and the values of the pixels surrounding it. If it is an LDRI, these values are typically between 0.9 and 1.0 and are therefore good starting values for Min and Max. All pixels with values that lie between Min and Max will be amplified in such a way that the brightest pixels (e.g. 1.0) get the value defined as Max Value, 10 for example. The new picture is a true HDRI with one or more strong light sources.
Sky
This plugin is a «Sky Generator» and creates a sky dome in
the Longitude/Latitude projection which can be transformed into a light
probe. The lower half is black. There are four types of skies to choose
from:
- CIE Standard Overcast.
- CIE Clear Sky.
- CIE Partially Cloudy.
- Preetham, A. J. Preetham Daylight Modell.
CIE stands for Commission Internationale de l'Eclairage, which is the International Commission on Illumination ICI. The following parameters can be adjusted:
- Red Color Sky (not for Preetham), e.g. 0.109.
- Blue Color Sky (not for Preetham), e.g. 0.349.
- Green Color Sky (not for Preetham), e.g. 0.680.
- Height, hight of picture, e.g. 256.
- Width, width of picture, e.g. 512.
- Month, e.g. 5.
- Day, e.g. 23.
- Hour, e.g. 13.
- Minute, e.g. 17.
- Longitude, geograhic longitude; e.g. 7.64241667.
- Latitude, geographic latitude, e.g. 46.30858333.
- Standard Meridian, e.g. 0.261.
- Turbidity (not for Preetham), e.g. 1.0.
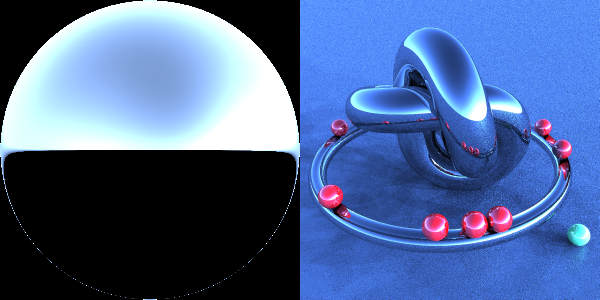
The sky dome at left was generated by the plugin. This is the HDRI for the render at right — the only light source. Rendered in Bryce 6.1 with 64 lights, Intensity at 5 and HDRI-Effect at 50.
© 2004 - 2018 by Horo Wernli.