
> Intro
• Overview
> Fisheye
> Cube
> Light
> Filter
> Plugins
— IBL and HDRI: HDRShop, Overview —
Introduction
HDRShop 1.03 was free years ago and this has been over for a long time. Meanwhile, there is HDRShop 3 that can be purchased. There are other free programs that can process HDRI. HDRShop is still popular and widely used even though it only runs on the Windows-PC from version 98 and is a 32-bit application. HDRShop also runs on newer 64-bit Windows versions.
Some options of HDRShop cannot be found in other HDRI capable programs even though some important options are missing. Here, the usage of HDRShop is discussed in detail and what the different options are good for.
Plugins
There are also several plugins: filter, tone-mapper, … that are very helpful
if one has them. Very much to be recommended are
Banty's Toolkit by Francesco Banterle, that are also available
from HDR Labs and work for Picturenaut as well. The global
tone-mapping operator Reinhard HDR Tonemapping Plugin for HDR Shop, can be highly
recommended, as well. Bryce 7.1 has this (or a very similar) tonemapper included,
all parameters are preset, though.
Camera Response Curve
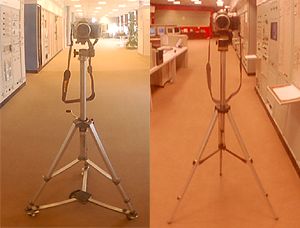
First of all the worst news: HDRShop cannot align the photographs. It is almost impossible to create a series of photographs without the tripd wiggling and with it the camera; certainly not with the tripod shown at right which is quite stable until the camera is adjusted for the next exposure. The one at left is stable. It is big, heavy, awkward to transport and rather expensive. There are transportable relatively lightweight and rather expensive tripods that do not wiggle and are worth the money. Additionally, you need a remote control to trigger the shutter.
The other bad news is that HDRShop cannot read and use the EXIF data embedded in the photograph. At least the gamma correction can be adjusted, provided it is known for the camera used. Those who want it more accurate may make HDRShop calculate the camera response curve. Now this is something other programs cannot do. To do this, you need a sequence of photographs.

The example above shows 8 photographs with the exposition times or shutter speeds of 1/30, 1/60, 1/125, 1/250, 1/500, 1/1000, 1/2000 and 1/4000 seconds at f-8.

The tool needed can be found here: Create > Calibrate Camera Curve. Clicking on this option opens the window shown below.

First, select the image sequence [2] Select Image Sequence. The following window pops over the one already open.

Here, the pictures are loaded [3] Load Images. In the Open dialog, the pictures are selected. HDRShop operates on f-stops, not with exposition times. But this does not matter at all since halving the exposition time (i.e. doubling the shutter speed) is equivalent to closing the aperture of the diaphragm to half. Click on the button that corresponds to the interval in which the photographs were taken. If the series was made in a different interval, click on Other … and enter the value. HDRShop now calculates the values and fills them in the table. Individual pictures can be Removed from the sequence if so desired. Usually, you want to calculate the camera response curve for all three colours (RGB), else select the desired colour. Accept the entries [4] to close the dialog.
Back to the actual calibration window. If you tick Regularize, the amount of curve smoothing can be adjusted and the curve gets less spiky. Of course, you will tick Draw Solution; if you would not, the curve would be calulated but not shown. Then click on Go [5], the button changes to Stop. Iteration shows the number of passes. The more, the more accurate the result. 2085 as shown here is not enough, have the loop run at least up to 10,000 for a valid result. The calculation runs until clicked on the Stop [5] button. Finally, the curve is saved [6] Save curve. The job is done, the window can be closed.
Assemble HDRI
Now an HDRI can be assembled. We have got the picture sequence. The camera was mounted on a stable tripod and the pictures are not displaced against each other. If this is not the case, HDRShop 1 is of no help. Try Picturenaut or use Artizen. We assume here that the pictures are not shifted and fit one above the other.

The tool needed can be found here: Create > Assemble HDR from Image Sequence. When clicked on it, the dialog window shown below opens.

First, load the image sequence [1] Load Images. Then, the Camera Response Curve [2] is defined. [2a]: if a camera response curve has been defined before, load it. Otherwise, the response curve is entered manually [2b]. The three most common gamma curves are predefined and are available by a click on the button, other gamma values from 1.00 to 4.00 can be entered numerically or adjusted with the slider control.
Now select the f-stop interval [3] Use Preset Scale Increments. If the pictures were taken in another sequence, the value can be entered in the Others … dialog [3a]. When all has been entered, click on Calculate and HDRShop fills in the values in the table. At the right most column some notes appear. Eventually click on [5] Generate Image button. After a while, the HDRI appears.
Display Picture
You really should remember this!
-
- [+] = Image display brighter by 1 f-stop,
- [-] = Image display darker by 1 f-stop,
- [ctrl]&[+] = Image display double size,
- [ctrl]&[-] = Image display half size,
- With the four cursor keys [^], [v], [<] and
[>] you can move the picture around in the window.
-

The status line at the bottom contains important information. When doing the screen shot, the cursor was at the up arrow in the sky. Looking at the status line from left to right, the cursor position is shown: Pixel 1520 from left and 248 from top has the colour intensities — Color Red: 0.030, Green 0.041 and Blue 0.062. At right, you see that the picture is displayed brighter by 3 f-stops and sized down to 1/8.
Saving
In the File menu you find Save As… [1]. This opens the dialog [2]. There are a couple of different HDRI and LDRI data formats available. The most common being the Radiance Format (*.HDR, *.PIC) and the Portable Floatmap (*.PFM). The Floating Point TIFF is a real 32-bit per colour picture. PhotoShop CS2 opens all three data formats, the PFM is recognised as Font file but opened correctly, albeit displayed upside down. Artizen 2.7.18 opens all three file formats correctly, so does Picturenaut but HDRIE (HDR Image Editor) HDR only.

On top of the Save Image As dialog, the picture size is shown. The picture may also be saved in a standard 8-bit per colour image. The f-stop selected while displaying it is considered. If this option is dismissed, it is saved with 0.00 stops. HDRShop shows the HDRI as linearly tone-mapped LDRI.
© 2004 - 2018 by Horo Wernli.